Winegard Traveler SK-3005

Saturday, July 4, 2009

Simple Satellite Locator


Here is a simple home made satellite pointer I came up with about three years ago. This makes locating a satellite simple and you will hit it the first time. You will have to have a clear shot and not aimed at trees. I have used this method and have never had any problems finding the satellite.

This system works with any dish. I use the Directv Slimeline 5 LNB dish now. I have used this method with single LNB standard dishes also. I now use the Slimline as a backup for the Winegard SK-3005 roof mounted dish.

First off I would recommend purchasing an adjustable contractor tripod. This makes plumbing the mast much simpler. The mast can be purchased or made by you. You can even use the adjustable mast that comes with the dish and mount that to the tripod. I use a couple of 2oLb weights to anchor the tripod. These are weights I no longer workout with.

The procedure I use to setup the Slimline is to first look up the coordinates for pointing the satellite using the DataStorm Angle Calculator http://www.datastormusers.com/lookangle.cfm

1. Set the Elevation and skew on the Slimline base.

2. Setup the tripod and plumb with the bubble level.

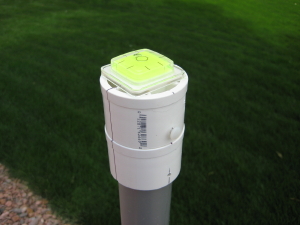
3. Set the azimuth of the satellite on the compass rotating dial. Place the pointer on the tripod mast and align the compass N. arrow to North on the compass dial. The compass is nowing pointing at the satellite and you will be pretty much dead on with little adjustment in azimuth needed.

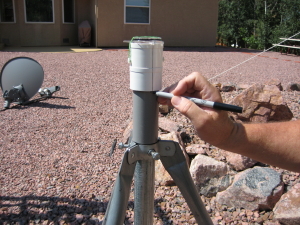
4. Rotate the rotating ring and align the vertical line of the Pointer and the rotating ring. Lock the ring down with the thumb screws.

5. Remove the satellite pointer and place dish on the mast and rotate dish until the center line is matched to the rotating ring. At this point I use a meter to peak the azimuth. Usually very little adjustment is needed. If you are in a large zip code you may be at the outer edge and you may have to adjust about 2 degrees to peak the signal.

6. Lock the dish down and you are ready to watch tv after hooking up the coax to your rig.

1. Make a PVC bubble level.


2. Make a PVC ring with 1/4" tapped threads for 1/4" thumb screws.
I used a band saw to vertically cut a line in the PVC ring and Pointer.


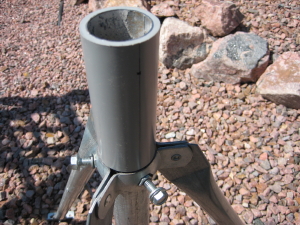
3. Make a mast PVC Bushing Satellite Pointer.


Pointer and Rotating Ring. Rotate Pointer to the Azimuth Coordinate of the satellite. Rotate the Rotating Ring to the vertical line of the pointer and lock the ring down. You are now pointing at the satellite. Simply mount the dish and center it on the rotating ring.


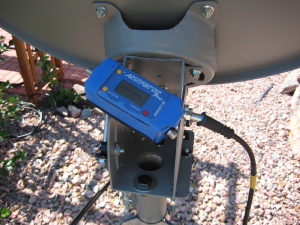
Dish Pointing at satellite.


The PVC parts above were purchased from Home Depot. You can also use a piece of 2" PVC Drain Waste Vent for the pointer shaft. You would cut to a length that would be suitable to reach the bottom of where your dish base sits on the mast and tall enough to be a few inches above the metal mast so the compass does not have a magnetic problem with the metal mast shaft. Usually about 5" above the metal mast is sufficient.
The Pointer above is 9" tall and about 4" of the bushings sit on the mast and meets the rotating ring.
A contractors tripod can be found at Home Depot for about $50. The compass came from WalMart. Note you do need a compass with a rotating azimuth dial. The parts for the mast can be purchased from a nuts and bolts place like Fastenal.
You can also buy a complete tripod and mast package from http://tiny.cc/Here952 or you can make your own.
I also use a couple of hinges on the LNB arm so I can fold up the arm for storage. They are simple hinges from the any hardware store. Cutting the LNB arm and installing hinges does not affect the signal quality at all and allows for quicker setup.

Wednesday, November 28, 2007

Tuesday, August 21, 2007

TriPod Mounted Slimline Dish


Recipe For 1 5/8" to 2" Mast

The DTV Slimline dish can be mounted on the same tripod you use to mount your round 18" dish. The HD Slimline dish uses a 2" mast and the round 18" dish uses a 1 5/8" mast. The 1 5/8" mast will have to be modified by increasing the size to 2". I did this by slipping a 5" long sleeve of of 1 ½” gray schedule 40 non-metallic electrical conduit over the top of the mast. This sleeve will need to be heated so it will expand and slip over the 1 5/8" mast. The simplest way to do this is to heat it in your oven on the top rack at 325 degrees for about 5 minutes. "Check it often and don't have a melt down." Once slipped over the 1 5/8" mast the sch. 40 sleeve will cool and shrink to fit the mast for a perfect fit for the dish mounting bracket. Guys tell your wife the oven thing is perfectly safe and it won't cause a mess.
"Make certain to anchor any tripod mounted dish well."

A new tripod has hit the market since posting the above tripod mast conversion. This new tripod is advertised to stand up to 100 MPH wind. This would be very helpful for use with the new HD dish units from Directv and Dish Network.
It comes with a 2" OD X 30" Long mast mounted in a 17" tripod. The mast is also secured at the base. I know the first thing I would do is extend the mast a little higher. This would decrease the stability in windy conditions. But, it would help with frequent setups at with RV travel. I could live with that. I would probably take my dish down in high wind conditions anyway.
You can check out the tripod at the following website.
http://www.solidsignal.com/prod_display.asp?PROD=RON6009

Another very stable tripod mounted dish system is to use a surveyors type tripod about $70 at home centers. A 2" offset mount cost about $100 and can be ordered from www.rovinginternet.com. This mounting system is like the portable internet dish setups but only using a 2" mount.


Monday, August 13, 2007

Satellite Pointer


JOLU’S Satellite Pointer

Many RVers use tripods to setup their dish for tv reception. Sometimes even seasoned dish users finds it difficult to get that initial coarse alignment on Satellite 101 for Directv. With the 5 lnb dish for HD programming it can be even more of a challenge to hit the satellite.

Materials

Here is a simple Satellite Pointer you can make yourself for under $15. You will need to buy a Silva Polaris Compass $10.84 (WalMart), 2 – 2” X ¾” PVC Reducing Flush Bushings (Home Depot plumbing dept.) $1.09 ea., 2 Nylon Push in fasteners 315” size $.57 (Home Depot). You can use your favorite compass if it has a dial to dial in the Azimuth.

How to Assemble

Stack and glue the bushings together. You need to have a ¾” fitting at the top and a 2” fitting on the bottom.

Draw a line on each side of the bushings from any two centering ribs at the top of the bushing using a square and extend to bottom of bushings. You will use these lines later to align your compass and dish Azimuth.

The Compass can be glued, double sided taped, or rubber band to the top of the bushings. The compass will need to be aligned to the lines on the bushings. Drill a 5/32 hole on opposite sides of lines on the top bushing and insert push in fasteners to loop rubber bands over if you use rubber bands.

This bushing assembly with the 2” fitting on the bottom will slip over the top of the 2” mast (mast is slightly less than 2”) currently used for the AU9 Slimline dish and can also be used for the 1 5/8” mast for the smaller dish and can sit on top of any 2” ID mast.

How to Use

Obtain your Azimuth and Elevation for the zip code you are located in and set the Elevation on the dish bracket.

Set the Azimuth heading with the compass dial.

Place the bushing assembly on top of the mast with the compass aligned to the lines drawn on the sides and top of the bushings.

Rotate the bushing assembly and line up the compass North pointer to the North arrow. Make a pen (Sharpie) tic mark at the bottom of the bushings where one of the lines intersects the mast. Then remove the bushing assembly. You will need to extend the tic mark down the mast to be visible once dish assembly is slipped over the top of the mast.

Now determine the center of the dish and mount that goes over the mast and make a mark. You will always use this mark in the future.

Place dish assembly on mast and rotate the dish assembly and line up the tic marks. You are now on the satellite and close enough to be able to fine tune the signal.

Notes & Tips

This Pointer will work with any satellite as long as you dial the coordinates into the compass.

You use two bushings stacked so the compass will not be disturbed by the metal mast.

A bubble level can also be placed on top of the bushings and used to plumb the mast.

A good program you can download for free to get coordinates for different zip codes comes to us from the good folks at http://www.datastormusers.com/lookangle.cfm. The program is easy to use and also gives the skew (tilt) you can use for the 5 lnb dish. Be sure to down load the zip code file into DSLookAngle folder in your computer program files. Another program you can download for finding satellite coordinates is at http://vps.arachnoid.com/satfinder/

Remember if you are using the HD 5lnb AU9 Slimline dish it is important to get the mast plumb so you can fine tune the dish and receive the proper satellites for Standard and High Definition programming. Aligning the dish is more complex than the standard round dish and a signal meter is highly recommended. “You can do it”. You can view meters at:
http://search.solidsignal.com/?q=meters&site=com&new_search=1&I1.x=7&I1.y=18.
I use the Accutrac22 Pro most always for aligning.


Dish Mounting Mast

Don’t throw away that old tripod and the 1 5/8” galvanized mast you are using for your round dish. You can convert that mast to a 2” mast by slipping a 5” long sleeve of 1 ½” gray schedule 40 non-metallic electrical conduit over the top of the mast. You will need to heat the 5” sleeve in your oven at 325 degrees for about 5 minutes. It will then slip over the 1 5/8” mast with ease and will cool and shrink to the mast for a firm fit. You now have a 2” mast for the Slimline dish. You will want to anchor the tripod well. View the AU9 Slimline dish, installation video and manual at: http://www.solidsignal.com/satellite/at9_install_videos.asp.

Converted 1 5/8" Mast

Converted 1 5/8" Mast
1 5/8" to 2" Mast

Bubble Level

Bubble Level
Plumb Mast

Pointer Aligned On Satellite

Pointer Aligned On Satellite
Marking Mast

Signal Meter Connected

Signal Meter Connected
Peaking Signals